02/13/2012
"How I Do It"
Buffing Aluminum Door Sill Plates
by Carl Bilter
The door sill plates on our beloved Chrysler products are often scratched, dented and highly oxidized after 50 odd years. With a basic buff motor, buff wheels and the proper compounds you can restore your sill plates to something a lot closer to factory condition, depending on how beat up they are to start with. As a DIY job, and if you are a bit of a novice like me, you probably won't get professional quality results. There are a number of vendors who will straighten and buff out trim for a fee, including some members in our club. However, if you are on a tight budget and enjoy the satisfaction of a DIY job, the results of your efforts should certainly yield something far better than what you started out with.
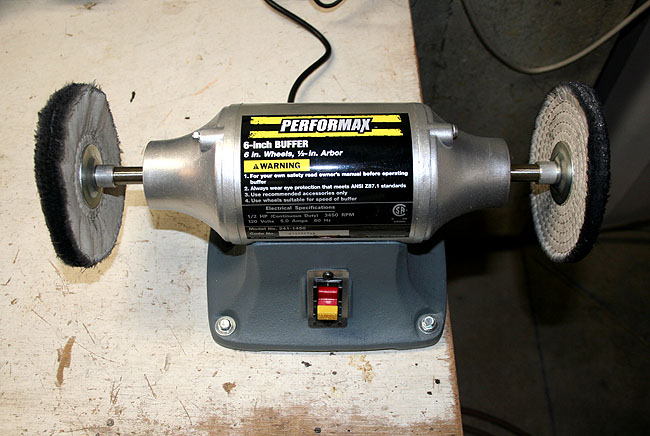
To begin, you need a basic buff motor. I got mine at the local home improvement store on sale to avoid hefty shipping charges by buying one over the Internet. It's made in China and likely not the best quality, but buff motors are pretty basic items and most run for a long time. Mine is a ˝ hp single-speed motor (3450rpm) that takes six inch wheels, but you can get more hp, longer shafts and accommodate up to 10-inch wheels in a more deluxe motor, as well as potentially a dual speed motor. If you are doing whole lot of buffing, that might be the way to go, especially if you can find a motor that's built in the USA. The motor needs to be securely mounted to a bench or standalone on a stand. You need enough room to maneuver your parts when buffing without interference from the motor or the bench.
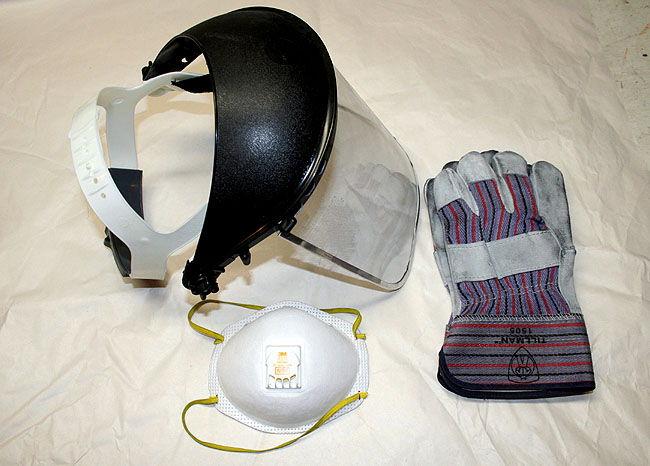 You also need the proper size buff wheels for your motor, a selection of different compounds, and proper safety gear. I ordered a buffing kit from The Eastwood Company that includes everything needed. Buff motors spin fast, throw lots of debris, and the parts get hot when you're buffing. Here is a picture of the safety gear including a face shield, dust mask and leather gloves. You also need safety goggles or wear impact resistant glasses under the face shield, as the shield may not be sufficient to provide protection from flying debris or parts. Buffing parts is actually quite dangerous. If you happen to catch an edge on your part (especially door sill plates which are very lightweight and have crisp edges), a buff wheel turning at over 3,000 rpm can rip the part right out of your hands. The speed of a part ejected by the buffer can be as much as 80 mph. Don't have any humans or pets in the vicinity of the buffer while you are working. This is one job where you don't want to short change yourself on safety gear.
Before you begin buffing, you'll want to clean your part and check for dents or deep scratches. Aluminum door sill plates are made of very soft metal that is easily scratched and dented. You can pound out dents with a trim hammer and anvil, and file and sand any remaining bumps smooth. However, remember the metal is rather thin. In my opinion, "less is more" when is comes to filing a door sill plate. In my situation, my objective was to clean up the door sills so that they would look presentable but not go overboard. I simply used 600 grit sandpaper followed by 1000 grit as needed to remove minor scratches and I sanded with light pressure. The metal is so soft that it is very easy to gouge the sill plate with sandpaper. Obviously, this won't remove and deep imperfections. You can start sanding with a coarser grit, but it will be more work to buff out the sanding scratches. You can also buy expander wheels or use greaseless compounds and use the buffer to do the sanding.
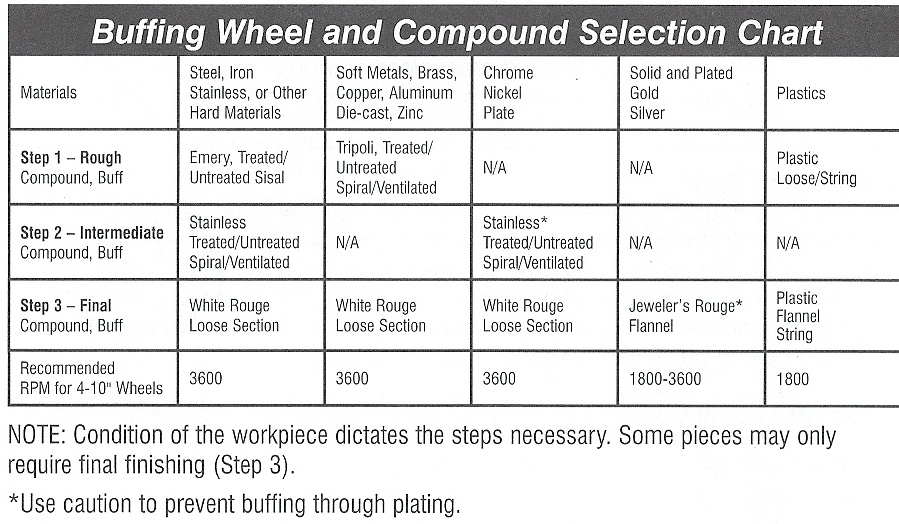
Selecting the correct wheel and compound is critical for the job. Above is a chart that illustrates the different types of wheels and compounds. Note that for aluminum sill plates only two steps are necessary using Tripoli compound with a spiral wheel and white rouge compound with a loose flannel wheel. Do not use the same wheel for more than one type of compound! You will contaminate the wheel and not obtain good results. I store my wheels in ziplock bags labeled as to the type of compound used on the wheel. Also note that for plated or plastic parts, a slower buff speed is recommended. You can use an old washing machine motor as a buff motor for this purpose. Plastic can easily heat up and warp; so great care must be exercised buffing plastic parts. You can also get a buff kit for an electric drill (which turns at a slower speed) and that is a good choice for plastic or tight spaces.
Before you start buffing, practice holding the part against the wheel with the motor OFF. Better to find out if you have enough room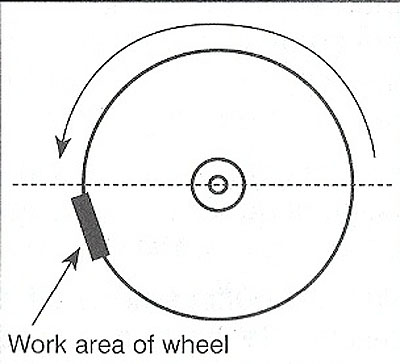 to work and have a plan of attack rather than have the part ripped out of your hands by the spinning wheel. Make sure that you are alert and sober. This is not something you want to do after hoisting a few down at the neighborhood pub! You'll want to hold the part firmly and use minimum pressure against the wheel (about two pounds of force). Excess pressure will load the motor down and can heat the part excessively causing warping or irreversible discoloration. You must be particularly careful with edges on the part. Always buff such that wheel runs off the edge of the part. In addition, you need to apply compound and hold the part against the wheel below the centerline of the wheel. Buffing below the centerline ensures that debris will fly away from your body and not into your face. Apply compound sparingly but fairly often. Too much compound will leave deposits on the part and is difficult to remove. I've found that oxidized aluminum sill plates will load up the buff wheel rather quickly. You need to use a buff rake to clean the buff wheel during the buffing process. You can make a buff rake from an old saw blade by attaching handles to both ends of the blade. If you get the Eastwood buff kit, a buff rake is included.
The vast majority of the work is involved in the first stage with the Tripoli compound. Slow and steady wins the race when buffing. The Tripoli will remove the oxidation and sanding scratches leaving a fairly shiny surface but will leave scratches of its own. The Tripoli is the "cutting" step and it will remove a fair amount of material. To check progress, hold the sill plate under an incandescent light bulb (assuming you still have such old fashioned and inefficient devices that are both inexpensive and reliable, sort of like most old Chryslers!) and check for evenness of sheen. Examination under fluorescent light is more difficult. Before moving to the final step, make sure to clean compound residue from the sill plate and make sure that the part has cooled off from buffing. You can use a product such as Eastwood's Pre Painting Prep, Griot's Garage Pre-Wax Cleanser, or even dish detergent and water.
The last step, using white rouge compound on a loose flannel wheel, goes much faster. The white rouge will remove scratches left by the Tripoli and bring up a brilliant shine to the sill plate. This final step is referred to as the "color" stage as little if any cutting action is done by the compound. Some scratches will remain visible, as well any deep imperfections. Be careful not to add new scratches handling the sill plate. Just rubbing a cotton cloth over the surface of the sill plate can introduce new minor scratches.
The sill plate will start to oxidize again quickly. To protect the finish you have several choices. Some sources recommend clear coating aluminum parts. I have tried this but without good results. Some clear coats will not adhere well to polished aluminum and they may dull the sheen. From my research, most experts recommend not clear coating the sill plates but rather just protecting them with your favorite metal polish, carnuba paste wax, or some form of clear sealant like Sharkhide or even a polyglycoat sealant.
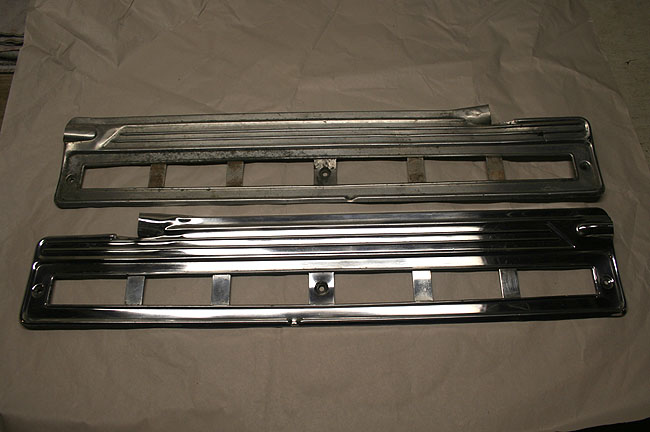
Here is a "before and after" picture of two Imperial door sill plates. The top plate is not buffed and the bottom plate has been buffed using the process I described above. I think it was worth the effort. The results look better in person than in a photo. Good luck and happy buffing!
Back